How To Be Happy

output_TbwgsaBeing happy is easy for some people. But to others it’s a little challenging. So here is a list of 10 ways to be happy.


1. Surround yourself with loved ones

2. Play with your pets

3. Go for a walk

4. Focus on the little things a person does to try to make you happy
(These are the type of people you should keep close)

5. Eat
(Lets be honest food makes everything better)

6. Hang out with friends

7. Take a nap

8. Go to the beach

9. Listen to music/draw

10. Just smile.
Try to smile as big as you can no matter what situation you are in. Chances are your mood will brighten up 10x more.

Just remember that it does get better and nothing bad lasts forever. I promise that you can be happy 🙂
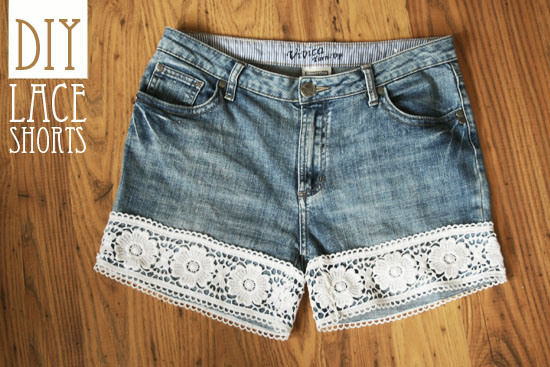
 

Lace Shorts

alyssa-diy


What you need for this DIY lace shorts

– lace
– jeans
– scissors
– sewing machine or needle and thread
– bobby pins

How to make this DIY lace shorts

First you have to decide on the length of the shorts. Put the jeans on or use another pair of shorts to lay on top of your jeans. Once you have decided on the length, cut the jeans. When the first leg is cut of you can lay the short one on the long one as a guidance for the cutting. Now you need to pin your lace on the shorts. I have cut of the lace a little longer then I really needed, you can cut off the extra later. My lace joins between the legs, because that’s the least visible spot. Sew the lace with a zig zag stitch on the shorts. The zig zag stitch on the bottom of the lace will also prevent the denim from fraying. I also did a zig zag on the top of the lace. I used a regular stitch to close the ends of the lace and secure it on the shorts.

Lemon Cheesecake

Crust:7 whole graham crackers

1 1/4 cups walnuts toasted

4 tablespoons butter or margarine melted

1 teaspoon lemon zestFilling:2 packages (8 ounces each) cream cheese softened

4 tablespoons golden honey blossom

2 teaspoons lemon zest

1/4 cup sour cream

2 large eggs

Topping:1 jar (11 1/4 ounces) lemon curd

4 lemon slices

Directions:

1.Crust:

2. Preheat oven to 350°

Chop graham crackers in food processor

3. Add nuts and process until coarsely chopped

4. Mix in butter and lemon zest, blending until crumbs are moistened.

5. Press crumb mixture onto bottom of a 9-inch springform pan.

6. Bake about 10 minutes until set.

7. Remove to rack.

8. Leave oven on at 350°.

Filling:

9. In a large bowl beat cream cheese, honey and lemon zest until smooth.

10.

11. Beat in sour cream.

12. Add eggs, beating until combined.

13. Pour filling into crust.

14. Bake about 50 minutes until center moves slightly. 15.Transfer cake to rack.

16. Cool.

Topping:

17. In a bowl beat lemon curd.

18. Spoon lemon curd in circles on top of the warm cake.

19. Refrigerate uncovered overnight.

20. To serve, release pan sides.

21. Garnish cake with lemon slices.

22. Top with whipped cream, if desired.

alyssa-diy

Flower Vase

alyssa-diy

Materials:

1. Glass juice jug (you can also use other bottles or cans you might have at home)

2. Acrylic paint (color of your choice. This will be the darkest color of your vase)

3. White acrylic paint

4. Small container to mix paint

5. Brush

6. Clear glaze or Mod Podge

Steps:

1. Peel off the label from the bottle. If any residue remains, run the bottle under hot water and use a knife or scraper to remove the excess.

2. Pour the color paint you have chosen into a container. Keep in mind this will be used to paint the entire bottle so poor enough to last.

3. Starting from the bottom, paint a strip all around the bottle.

4. Let dry for a few minutes and add a second coat on top. Repeat, if necessary, until the bottle underneath is completely covered.

5. Add a touch of white paint to the container and mix thoroughly. For a more gradual transition between colors, add a very small amount of white paint each time.

6. Working your way up the bottle, paint another strip around the bottle.

7. Continue adding white paint to the mixture and painting until the bottle is completely covered.

8. Once dry, add a quote of clear glaze or Mod Podge (gloss or matte finish, your choice) to seal in the paint.

9. Lastly, just add water, flowers and enjoy your new handmade vase

Honey Comb Tree

allyssa-diy

Supplies:

5″ Honeycombs (For this tree, about 4′ tall, I used 49 honeycombs. You could make yours larger or smaller, depending on your space!)Painter’s Tape or Other Non-Permanent Adhesive.

Steps:

1. You’re going to want to work from the bottom up, starting with the tree’s trunk. If you’re using multiple colors, before starting anything, I recommend laying out or sketching out what colors you want where so you aren’t repositioning everything. Place a loop of painter’s tape, or your other adhesive, on each side of each honeycomb. Start with 4 honeycombs for your trunk, placing them as desired in two rows/columns and pressing firmly (but carefully) to secure to the wall. Each honeycomb will only be opened half way, as it will be taped to the wall.

2. Now you’ll start your tree! Start from the center of the trunk. Each honeycomb will be placed in between the two honeycombs below it. Work your way out on each side until you have the desired width of your tree. Then repeat and repeat until you’ve reached the top (one single honeycomb)

3. If you have a space with high ceilings, I think it would be amazing to do a gigantic version of one of these, just lengthen the trunk and widen the tree. OR Use larger honeycombs.

Polka Dot Coasters

alyssa-diy

Supplies:

1. Clear glass coasters (you can also use glass plates, vases, etc.)

2. Removable round stickers

3. 2 contrasting colors of spray paintCraft sealer (such as Krylon Low Odor Clear Finish)

4. Newspaper

Steps:

1. Turn the glass coaster upside down and randomly place several removable round stickers on top. If you are not sure they are removable, test it on another piece of glass first, let it sit for several minutes and try peeling off. If residue remains on the glass, you may need to use different stickers.

2. In a well-ventilated area, place the coaster onto a newspaper-covered surface with the stickered side facing up and spray paint over it until it is completely covered. Apply a couple thin coats and let dry between each coat. Make sure to not over-paint to avoid the paint from seeping through under the stickers.

3. Once the paint has completely dried, remove the stickers. Be extra careful not to peel off any of the paint on the glass.

4. Grab your second spray paint color and add another layer of paint on the back of the coaster to create the polka dot effect. Let dry thoroughly.

5. To avoid the paint from chipping and to add a finishing gloss, spray craft sealer on your painted surface following the manufacturer’s directions. Adding a sealer also allows you to wash the coaster if needed.

6. Once dry, turn the coaster around and use them to serve your favorite drinks!

Crayon Melt

alyssa-diy

Step One: First you’ll need a plain white canvas. Take a mental picture of this pure crisp whiteness, for soon it’s blank surface will be transformed into a work of homemade art.

Step Two: Unpack your pack of crayons. Use a pack of 64 if your board is wider. Lay them out at the top of you board, touching side by side. Now is the time you can arrange them in the color pattern you desire.

Step Three: Using a hot glue gun carefully glue the underside of the crayons with their point facing down towards the empty expanse of the canvas. If you have preoccupation tendencies, as I do, be mindful that a hot glue gun can get hot, does emit a very strong adhesive and should never be left unattended when plugged in.

Step Four: Remove your hot glue gun and make way to plug in your blow dryer. Turning it on High, give each section that your blow-dryers nozzle can cover due attention until you see the crayons turn shiny and sure enough, the wax will start dripping down in a glorious river of color. To ensure that the crayons melt evenly aim your heat at the wrapper so it liquefies from the inner core out and the point of your crayon still bears a faint resemblance to its original state.

Step Five: This entire process happens quickly and offers instant gratification much art is incapable of. So once you are satisfied with the drips turn your blow dryer off and within several minutes your work should by dry and the crayons should be back to a solid.